Garden Design
It has been a pleasure to have the opportunity to freely design this project. The school was open to new ideas, and from the beginning they have trust on what I was doing without putting impediments in terms of creating.
The design ideas and sketches has been made with Nim (my partner), and after I have passed to a digital format delimiting the final shape.
The design ideas and sketches has been made with Nim (my partner), and after I have passed to a digital format delimiting the final shape.
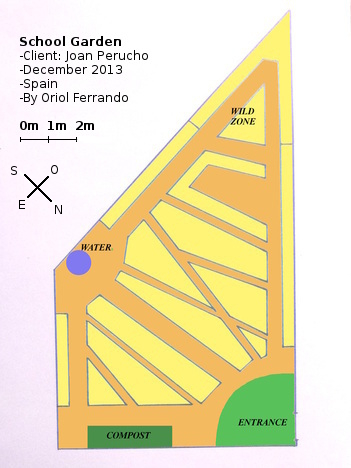
Design Map
|
The design is mainly thought in order to give to the school children a space where they can enjoy the learning process, where is practical to move comfortably in groups facilitating the teachers work.
For the beds design I have focused on two key points, one is the water tap and the other the garden entrance, creating good flow of people and easy management of the hose through the site. At the front door I have left enough space to receive the groups, and be able to give the explanations of activities from there. There is also a place to leave tools or other objects. To delimit the paths we have drawn lines emerging from the entrance and the water point as a main points, going in a radial shape towards the garden edges. After crossing the lines we have shaped the paths and the beds. Thus from the entrance we can have a good vision of the accesses and beds, seeing from the door most of the planted items, and quickly get an idea of how to access them. On the map I have defined the paths in brown earth color, and the beds in yellow color (like the straw on the beds when are mulched). |
There are two main ways to walk around, one that surrounds the site and other that crosses trough the middle (from the entrance to the water point). These are eighty centimetres wide (forty more than the others) to give access to the student with wheelchair.
|
Compost is located near the entrance to bring easily remains of organic matter from the outside, this is represented on the map in dark green.
All around the edges of the garden I put as many beds as possible, to enjoy the different conditions that this ones provided and to plant vertically or make windbreaks. As you can see the north is not pointing up at the map because I have thought that was more practical. The school already had a site map and they was used to seen it in this way, also because the entrance is at the map's bottom I think that they can situate themselves more easily. Also I think that they will not take much in consideration where the north is, and drawing the map like this fits better in a sheet paper. |
Old site map
|
Zones design
I have tried to design my zones thinking about the proximity to the people's flow, and the time that require every space to implement and maintain.
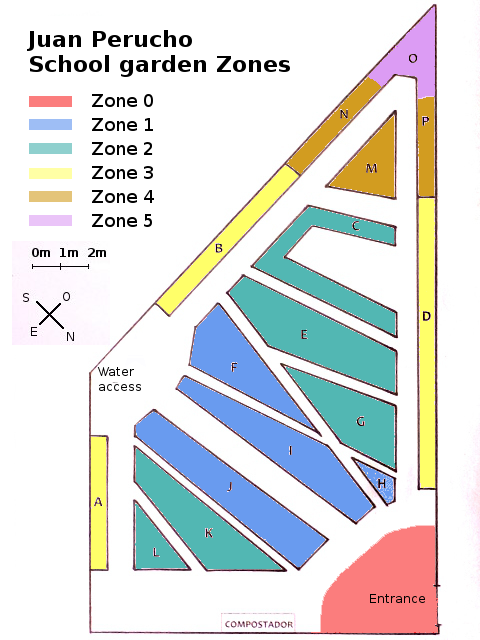
Site Zones
|
Zone 0
This is the reception area, the site's place where everyone have to pass through and where all the students, visitors and teachers use it as a welcoming space and where we have more people transit, so it have to be easy when people is changing them clothes, giving explanations or taking notes, it needs to be practical and comfortable "like home". Zone 1 This are the garden beds between the entrance and the water tap, so it's like the main avenue of the site and daily is people passing through there (even with wheelchair). A great place to put the handy garden plants, with more diversity and examples to see. Zone 2 It's not so busy but it have high maintenance garden beds, here it can be planted the annual plants to use for the school kitchen. |
Zone 3
Those are the garden beds that we will plant mostly perennials to work as a wind breaks.
Being on the edges of the site we can use the vertical space that provides the walls , and we can plant low maintenance annual and climbing plants as pumpkin or climbing beans.
Zone 4
This space will have very low interaction, only with perennial plants that we can see at the natural environment around the school and have useful properties as a medicinal, aromatics, etc...
|
This way students can see how nature works and understand their patterns, integrating these into the way how they see agriculture, and holistically improve the relationship between them and the ecosystems.
Zone 5 At the top of the map there is a corner that has been design as a wild area without interaction just to observe, this is my partner's Nim idea with who I made the main garden design. Because now there is nothing in there we have thought to put some elements that we can see in natural ecosystems of the area, let it develop freely and the succession will do the job. Where will be logs and woody branches to create a small place where insects, fungi, small mammals and birds can be, having a place for them to be integrated into the garden. |
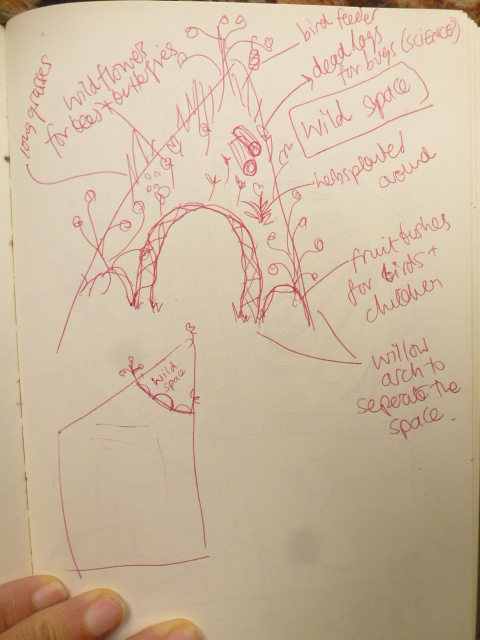
Nim's wild area sketch
|
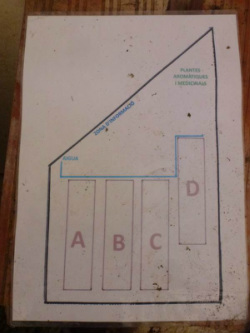
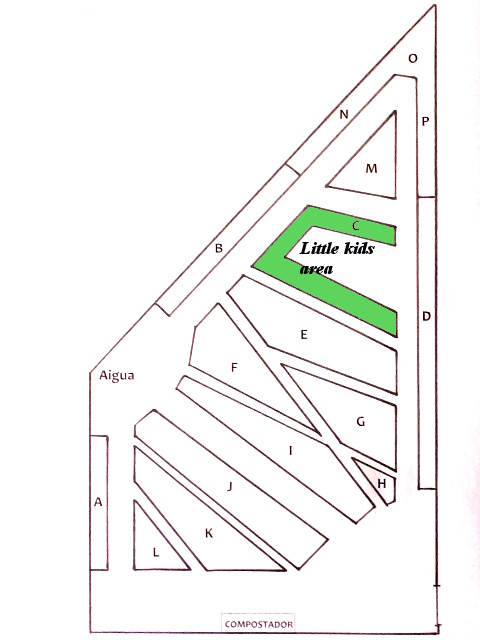
Little kids area
|
Into the garden design I wanted to have a space dedicated especially to the youngest kids, with different and better conditions adapted to their needs. In this area there is bigger space to move and work easily around the bed, with groups up to fifteen little kids. The width of the bed is thought for the length of their small arms, these are narrower so they can cover all the space doing the work easy without having accidents, such as falling over the plants or compact the bed soil. You can see this space colored in green at the left picture. |
Sketches
It has been several sketches for this project.
The first ones in red pen are made from my partner Nim, who along with mine we mixed the best ideas to define the final design.
The first ones in red pen are made from my partner Nim, who along with mine we mixed the best ideas to define the final design.
|
|
Garden beds
I'm not very keen on plowing but the site suffered enough compaction by handling the past years. I think that for convenience and low maintenance it is best to make raised beds, so the intention is to plow once and thereafter maintain the soil structure and add compost and organic matter, becoming every year more raised beds.
|
We have added a lot of horse manure at least three months before planting, to fix some more nutrients and ensuring that we have enough time to mature into the ground before planting.
The intent is to maintain the structure of the beds with wooden slats around the edges, but per now we will let them without to see if the design works in a practical way and to make adjustments if necessary before having fixed structures. If the design is functional is scheduled to do so in the next autumn. Finally we will mulch to protect soil life and above all, stop the weeds growing overwhelmed by all the site. |
Raised bed example
|
Companion planting
I made some combinations of companion bed planting to give them information and inspiration for this year and the next ones.
I also gives to them information about with photocopies.
Bellow are some examples of this combinations.
I also gives to them information about with photocopies.
Bellow are some examples of this combinations.
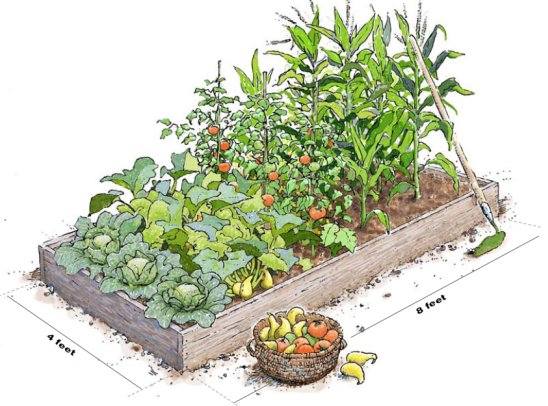
1 - The Three Sisters: Corn, pumpking and beans
2 - Tomato, basil, marygold
3 - Eggplant, peppers, lettuce
4 - Beans, lettuce
5 - Spinach, garlic, radish
6 - Onion, carrots
7 - Lettuce, beetroot, parsley, coriander
8 - Sunflower, cucumber
2 - Tomato, basil, marygold
3 - Eggplant, peppers, lettuce
4 - Beans, lettuce
5 - Spinach, garlic, radish
6 - Onion, carrots
7 - Lettuce, beetroot, parsley, coriander
8 - Sunflower, cucumber
